

Guild Wars 2 Guide to Old Lion's Court Strike Mission
This article is about the Old Lions Court Strike Mission in the Guild Wars 2 game. We will be discussing the way to get started with the mission and how to progress further into the gameplay efficiently and effectively. It’s worth mentioning that you won’t need to buy any expansion or story to start this mission.
Whether you are a new player or a veteran, this article has something for everyone. So, what are you waiting for? Read along with the complete article to fully understand how to get started with Old Lions Court Strike Mission in Guild Wars 2.
Knowing About the Mission
Old Lion's Court, part of the Strike Mission, takes place during Scarlet Briar's siege of the old Lion's Court in Lion's Arch. As mentioned previously, to begin the mission, no story or expansion is necessary. The objectives of the mission are simple enough to understand:
In any MMORPG, no mission is without its rewards, otherwise, what’s there to motivate players to complete the mission, right? So, here is the list of all the rewards that you can obtain while completing the Old Lions Court Strike Mission in the Guild Wars 2 game.
Getting Access to Old Lions Court Strike Mission
Getting there is simple. You can either reach the location of Scrying Stone situated next to the Lion’s court, in Lion’s Arch. The other way is to interact with the Lyra in Arborstone. This will allow you to use the Strike Mission Portal and get to the Old Lions Court Strike Mission.
What should your team look like in the Old Lions Court Strike Mission?
A CC, 2 Tanks, and a Kiter along with enhanced Mobility are what you should look out for while forming the team. CC is one of the most essential components that you must have. Though it’s quite handy, you should use it judiciously and not rush to judgment about when to use it. Then you can employ 2 tanks that can be positioned for Green and Red Watchknights. Green Watchnights are tough opponents and work in groups.
Hence, it becomes crucial to separate them from others when you are at a later stage of the game. And what's better to do that job for you than a Kiter? Try to use mobility to your advantage. Stats like Superspeed, ports or leaps can help you move at a good speed and get back to your team when you are done with the mechanics. During this encounter, you will be moving a lot. It's your job to make sure you don't get separated from your team. It would be risky to do that as you will be alone and no one would be there to help you if the enemy captures you.
While completing the missions, you will be required to spend Gold, the in-game currency of Guild Wars 2. So make sure you have a good stock of it. If you are falling short of the same, the best way to get them is for real money.
Visit our website GW2Sale to purchase Guild Wars 2 Gold at the cheapest rate on the web. We offer quick delivery, safe payments, and 24x7 chat support. Also consider purchasing Guild Wars 2 Items to get an edge over other players.
Walkthrough & Bosses in Strike Mission
The first encounter that you are going to have in Strike Mission would be the IBS EZ3. If you are a beginner or just looking for an easy entry into the mission then IBS EZ3 is for you. It includes strike missions such as Fraenir of Jormag, Voice of the Fallen and Claw of the Fallen and the Shiverpeaks Pass.
Mechanics
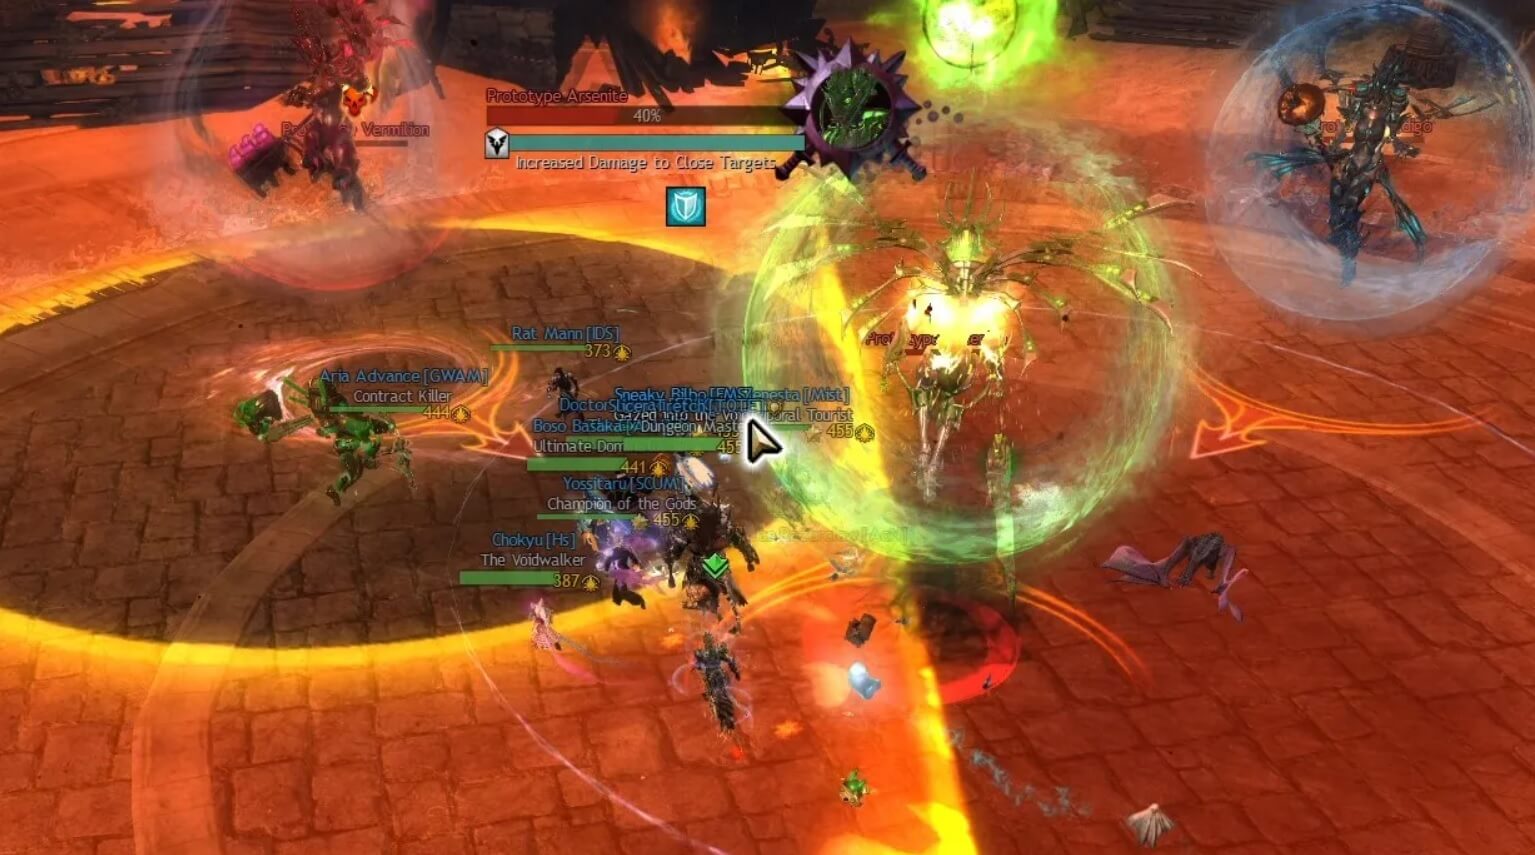
Watchnight Triumvirate begins releasing the ultimate move, an inescapable Area of Effect (AoE) attack when they land on the battlefield. The Area of effect attack will begin wiping out the players. Since there are three bosses they would be dropped one by one. Though players can also reverse this effect by destroying the Defiance Bar of the Boss. Another option is to move to the safe zones as quickly as possible. When you destroy or break the Defiance Bar, you also harm their Ley Energy Shield. This will allow you to stun the boss, even if you don't attack it explicitly.
Players should look out for the fixation of the bosses. When a player comes within range of a boss, it becomes fixated on that player and begins to attack it continuously. Which boss has a fixation on a player is indicated by the colour of the icon above that player. Now, that player can lead the boss away from the teammates. Your other task would be to manage the arena space by placing the Boss properly.
Bosses
All three bosses will descend at various times during the battle and simultaneously channel their deadly AoE assault. For the challenge mode, the sequence to remove their defiance bars is random. This is contrary to the Normal settings of the game (Green, then Red, and then Blue). The game features 3 Watchknight bosses, and each has a unique set of abilities. You want to position yourself and act in a manner consistent with which ones are now operating:
Prototype Vermillion (Red)
The key to defeating this opponent depends on timing and placement. After it spawns, it's going to concentrate on the player who is nearest to it, which is indicated by a Red Symbol over that player. The Watchknight will subsequently concentrate their assaults on that player. The Red Watchknight will be enclosed in an orange outline, with white arrows pointing either outward or inward. Players should place themselves outside or inside of the line depending on where the arrows are pointing. There will be a shockwave that hits the entire group for each player that is on the wrong side.
Arrows that point both inside and outward are OK, but the sequence in which you receive the mechanic will depend on this since it always alternates for each player separately. In other words, if you move inwards at first, you'll have to go on to the second by going outside, then back inside, and so on.
Talking about the Mechanics of Prototype Vermillion, it has:
Boiling Aether - Each boss will use this mechanism at some point throughout the fight. It will initially appear as a tiny blue puddle before expanding into a large crimson circle. You can survive by avoiding these puddles, but later in the battle, more and more of them will spawn. Try to put these at the arena's edge to save space.
Attack Chain - A broad Orange effect will be produced by the third attack in the Red Watchknight's series of hammer attacks. A Boiling Aether will be generated on the ground after every second completed attack chain, and you can hear a loud siren as it does so. By kiting the boss, you can prevent them from advancing their attack chain, delaying this. The player fixated on the boss, ought to take it far from the others and close to the arena's edge. While casting the In or Out mechanic or channelling their break bar, they won't perform their attack chain.
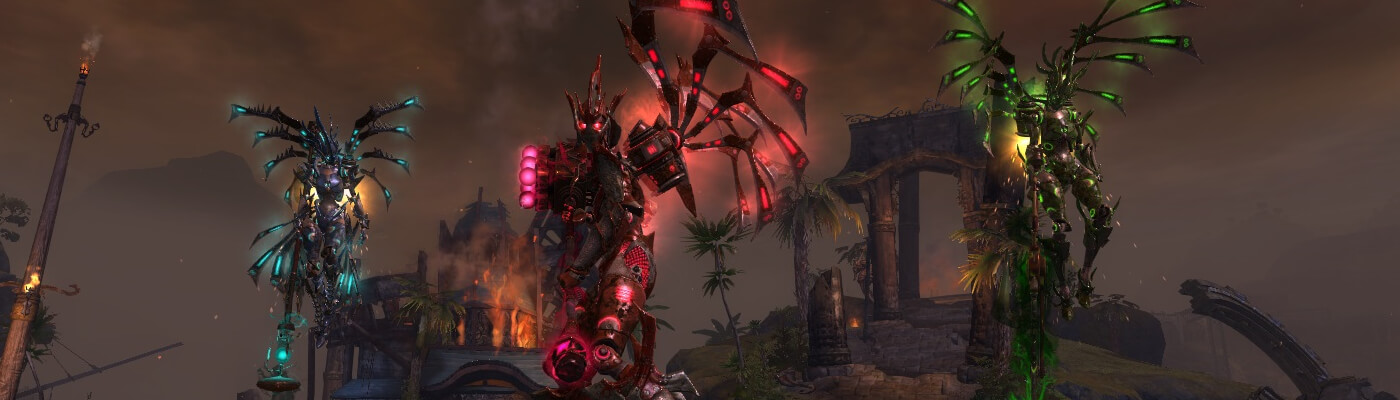
Prototype Arsenite (Green)
The main strategy for this boss character is to kite and maintain distance. After it spawns, it will continue to follow the individual who is nearest to it, as shown by a green signal above that player. When that happens, the Watchknight will get fixated on that player. The Kiter can shift this opponent farther from the rest of the party while several bosses are active at once to avoid stack mechanics. Players will be pushed in the direction of a red pool that pulses damage after a cascading red animation. As a group, move as far away from this as you can while remaining united.
Tether - A green line denoting the completion of the Green Watchknight's automatic attack chain twice will tether the player who is the furthest away from it. The Green Watchknight will then fire a projectile at the tethered player after a brief delay. When it gets there, it will cause the ground to boil with aether. This puddle will continue to expand until it solidifies. To save space, try to relocate these to the edge of the arena.
Prototype Indigo (Blue)
This enemy's strategy is to stack and remain nearby. Because this Watchknight is largely immobile, the fixation does not matter.
Wind Gust: This attack will drive players away while inflicting pulsating damage that increases in severity the farther they are from the attacker. Always keep heading in the direction of the boss so you can reunite with your healers and take less damage there.
Three orange rings are displayed around three participants. Spread these out, but don't go too far because if you are too far from the Watchknight when they start to use their Wind Gust, you could get caught. When these circles are going to burst, try to dodge inside to prevent the damage from spreading too far. The damage from these circles can be prevented or avoided.
Conclusion
That was all about getting started with the Old Lions Court Strike Mission. We discussed the game mechanics, what the mission really is and what are the rewards associated with the mission. After that, we’ve also discussed the Bosses and mechanics associated with them. The article tells you about the various bosses of the Strike Mission and how to counter them. We have that it helped you. This will be all from us for now. Stay tuned with us for more details.


