

Guild Wars 2 Guide to Harvest Temple Strike Mission
Guild Wars 2 is an awesome MMORPG with various gaming modes, features, skilled characters, powerful abilities and above all the most thrilling and exciting strike missions. If you haven’t heard of it, then most probably you are new to this game or new to the strike Missions. Strike missions are simply a 10-player team battle where the players fight against the environment, that is, PvE. Strike missions also include the Boss Battles and it also serves as a connecting path between raid and open-world difficulty.
In this article, we will be discussing the Fourth Canthan strike mission, i.e, Harvest Temple Strike Mission. The endgame for the players of level 80 is filled with intriguing characters, thrilling boss battles and a lot of precious rewards that you can acquire. All in all, there is no reason to hold yourself back from enjoying this scintillating content that the developers of Guild Wars 2 have provided.
We will be discussing What the mission is all about, what are the rewards, who you will be fighting against and how to defeat them. The Walkthrough and Mechanics is also included in the article. Make sure you read along the complete article so that you won’t miss anything. Let’s begin then…
Knowing About the Mission
Harvest Temple Strike Mission is the successor of the Strike Mission: Kaineng Overlook. In Harvest Temple you will be playing in different phases of the game, and this multi-phased battle is a tad bit harder than its predecessor. These phases are exhilarating and require you to play against a minigame, elder dragons and mobs (as it’s a Player vs Environment). The mission takes place on the top of the Harvest Temple, hence the name. The Story that will be covered is that of The Only One.
As mentioned that the battles will be significantly difficult from its predecessors, you can’t hold anything back. Your job is to neutralize the Dragonvoid and you have to take any action that is necessary. For that you have to get yourself acquainted with the Guild Wars 2’s combat system. Also make sure you have enough Gold for indulging into the combats. If you don't have, purchase it for real money from reputed and trusted seller GW2Sale.
Visit our website GW2Sale to purchase Guild Wars 2 Gold at the cheapest rate on the web. We offer quick delivery, safe payments, and 24x7 chat support. Also consider purchasing Guild Wars 2 Items to get an edge over other players.
Objectives
Then you have to go through - Heart of Jormag, Heart of Primordus, Heart of Kralkatorrik, Heart of Mordremoth, Heart of Zhaitan, Dragonvoid, Heart of Soo-Won, and finally again to Dragonvoid. Once you finish these, the strike mission is over.
Rewards
Rewards differ in normal mode and in Challenge mode. We will be listing only about the normal mode here.
Getting Access and Phases of Harvest Temple Strike Mission
Getting there requires you to use the Portal next to the Font of Elders, Southern Bluff in Dragon's End. You can also use the Strike Mission Portal by directly interacting with the Lyra. Now, let’s discuss the various phases of the game. Each Dragonvoid Phase of the game is preceded by a Purification Phase.
Let’s discuss these phases in detail now.
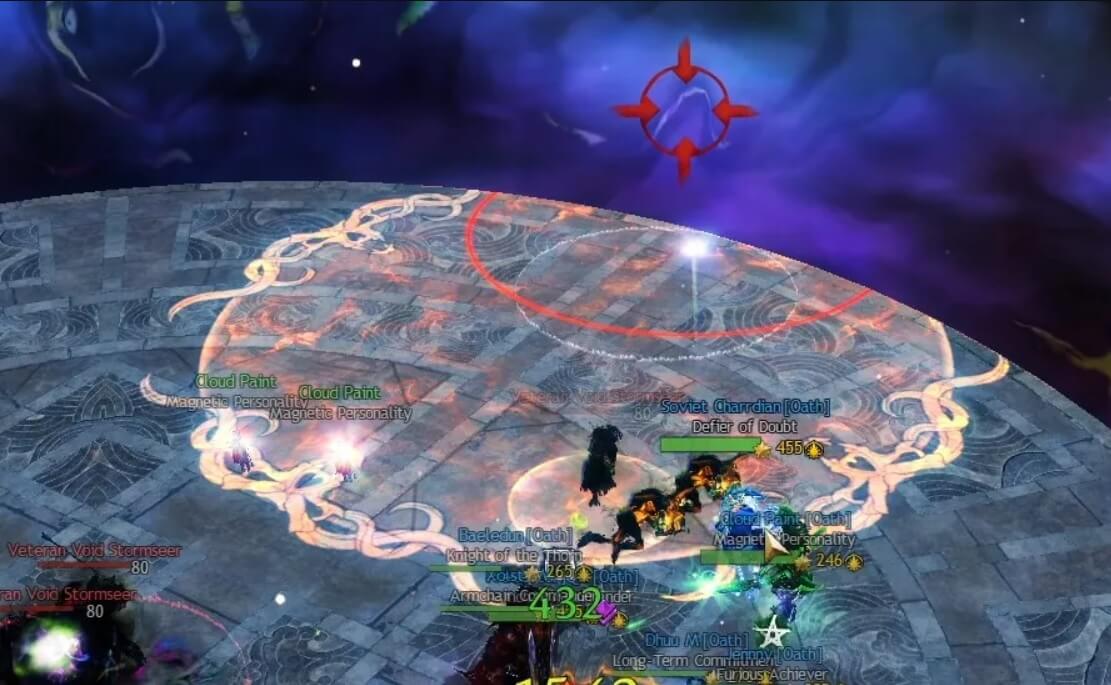
Purification Phase 1
Influence of the Void
During the battle in this phase, you will notice the black orbs throughout the battlefield. It would be either at the center or at the corners of this location. Its impact would create a void on the ground which can be easily identified by a circle of red color. Once you get stuck in this void area, the damage that you will take will increase significantly. You will have much less space to avoid it. After one point, these orbs will heal the boss and affect you and your teammates.
Heart of the Void
A big orb that changes color in accordance with the situation will be present for the majority of the encounter. Pushing this ball into the white circle of the floor will mostly cleanse the void inside of it. The orb is going to move in the reverse manner of players who touch it and is unable to be propelled by CCs. Fast multi-hitting strikes will move the orb more quickly, but because of its high inertia, it can be challenging to guide it in one way or another and will usually continue moving even if you stop striking it. Ranged players are ideal for pushing the Heart around since they're capable of greater positional control, and if numerous players hit the Heart at once, the momentum can spiral out of control.
The dark Influence of the Void orbs will generate voidlings who will try to reach the Heart of the Void every time the Heart of the Void reaches a white circle, at which point it will shift into attunement with another Elder Dragon. The Heart gains a break bar after three attunements, which you can CC to move on to the following phase.
Dragonvoid Phase 1
Jormag Phase
Once you cross the Purification Phase 1 by purifying the void, Jormag Phase begins. The Dragonvoid is now vulnerable and can be destroyed. You have to get back to your squad and use the stack to buff and DPS the opponent here (boss).
Primordus Phase
After Jormag's Dragonvoid is complete, Primordus starts, and a large number of enemies emerge. Utilize massive AoEs to cut off them out as well as any lingering Icebrood Seers as you rush out and encounter them midway onto the platform. Steer away from the boss since the next mechanic will start the fight first.
Kralkatorrik Phase
When Primordus is beaten, Branded Devourers will appear. It can be challenging to eliminate these mobs before concentrating on the boss because they have break bars and ranged attacks. Clear as many Devourers as you can by moving halfway out to the center of the platform, then stack back on the boss. Devourers that are excessive can be eliminated later.
Purification Phase 2
The team has to disclose Mordremoth and Zhaitan's Heart when the Purification Phase/Heart of the Void returns following Kralkatorrik's Dragonvoid. The swarms of bugs are going to leave it when it is Mordremoth's Heart and cause only slight damage to players. Those lingering in the dark green puddle left behind by Zhaitan's Heart will sustain damage that is moderate. This is why it is ideal to have ranged players move the Heart.
Dragonvoid Phase 2
Mordremoth Phase
Once the dragonvoid has been cleansed, stack to DPS Mordremoth's void. The only new mechanism in the current phase, which also scatters some moderate Area of Effect damage over the platform, interacts with existing mechanics, making it the most hazardous.
Zhaitan Phase
When the Zhaitan Phase starts, players would witness the birth of 3 Giants. These Risen Giants are extremely powerful and had to be dealt carefully. They are going to exert pressure on your team by hitting hard. They will also leave the green puddle on the platform of the battlefield. You may look the other way and directly go for the main opponent Zhaitan, but it would be too risky to do that. One approach that you can follow is to use a kiter to lure the Giants away from the Zhaitan. Then use the ranged attacks and stay away from their arc to dodge any punches. In this way you would be able to avoid the damage that can be far greater than your expectations. Keep your balance.
Purification Phase 3
A Saltspray dragon and a different Heart of the Void will hatch together. Assuming you're equipped with a lot of DPS & have the means to divide the group, concentrate on defeating the Champion prior moving on toward the Heart. Avoid the numerous AoEs and orbs that are circling the space. After two White Circles, CC the Heart.
Dragonvoid Phase 3
Soo-Won Phase
Avoid the center of the battlefield’s platform where Soo-Won frequently swipes her tail and sporadically swipes close to her. Avoid it or adjust your position. A Tidal Wave will be produced when Soo Won smashes the tail in the middle of the space. She will quickly ascend into the sky with a spreading orange circle, then descend, which will bring a tidal wave closer to her. To avoid being taken away into a more perilous area, duck or jump through this.
Void Amalgamate
The Heart of the Void would integrate to create an Amalgamate whenever Soo-Won hits 50%. The orb continues to be moved by striking it, however, the team should Destroy it right away. Avoid applying multiple hits because they will cause it to move more quickly. The team should, in theory, divide equally surrounding the Heart in order to maintain it in its proper place, although balancing is tricky, and you might need to switch sides frequently to alter the Heart's speed.
If you happen to remain in the line of the little orbs launched by the Heart, they can do significant damage, therefore avoid them when trying to move. Additionally, the Heart can be used to reflect projectiles, greatly simplifying this phase.
A Destroyer Champion Obliterator that can saturate the area with fire AoEs will spawn after the Amalgamate is complete. Depending on your team's DPS, you can merely concentrate on restoring Soo-Won's remaining 33% health, or if you don't want to take a chance, you can finish the Champion before moving on to the boss.
Conclusion
This was all about the Guild Wars 2 Guide to Harvest Temple Strike Mission. We hope that this article has helped you to understand the gameplay and mechanics of the mission. We’ve also covered the ways you can fight the boss. This will be all from us for now. Stay tuned with us for more updates.


